Popular Post

Saturday, October 30, 2010

Start Small....(for the Holidays)


To the left is a link to a free pattern offered by Quiltmaker Magazine for a set of very easy and quick Holiday placemats.  You will find instructions for there napkins as well.

I am going to put together a few sets of these for hostess gifts.

So get out that holiday fabric, grab a cup of tea and get into the holiday spirit.....slowly....don't panic...start with a small project.  We can handle this!  Right?
Even if we have to put it off until the last minute...it really is do-able.


Friday, October 29, 2010

Feet, Feet, Feet!

Feet, Feet, Feet!

Florence over at Flossie Teacakes has taken the mystery out machine feet and given us some great ideas of what we can create!  She has given me permission to quote from her blog post to bring you this great information.

Be sure to visit her well crafted and delectable blog  and  shop.


Wednesday, October 27, 2010

blog DD: Prvi susret sa modom

blog DD: Prvi susret sa modom

Prvi susret sa modom

Nikada nisam  pjevala sa  četkom u ruci  ispred ogledala, nije  mi padalo na pamet.Možda zato što sam već provjerila da ono što čujem ja i ono što čuju drugi nikako nije isto i da ja bezobrazno navijam za sebe! Od toga sam odustala već u vrtićkoj dobi. Uostalom i glas mi je već u toj  dobi bio"kao iz bureta" što je bilo pomalo neobično  za  slatko ,pleteničasto derište ali su mi to rekli tek u pubertetu. Prigodno.
Mama je radila. Kad više nisam išla u prokleti vrtić(o toj temi moram pisati), čuvala nas je -teta- koja nije ostavila neka sjećanja u meni, više se sjećam sebe u maminoj sobi kraj otvorenog ormara i veeelikog ogledala. E, to je bilo uživanje, to je bila zabava, bezbriga!
Haljine  i haljinice,kostimi i suknjice, šuštavi taft i nježna svila,  šareni pamuk i tada vrlo moderan  najlon! Još pamtim neke posebne komade zbog kojih sam stradavala  jer sam "opet  kopala po ormaru" ali ja ni danas tome ne mogu odoljeti a kamoli onda. Svaka je žrtva bila opravdana i laka! To je bio moj  prvi susret sa modom!

Monday, October 25, 2010

The Process Pledge

I found the process badge on somebody's blog a while back....checked it out and liked the idea.   So,
I took the process pledge. This whole process came from the fruitful mind of Ms. Rossie over at Mutant Quilting.  Go on over and take a look....But COME BACK...I'll wait for you.  Please don't outclick to other yummy looking sites you will find there.  (start using Delicious so you can find your way back.......sorry, that's for another post).


Are you back?  OK....So far there are 420 of us who have signed the pledge.....that is kind of  a lot of quilters who are willing to take the time to photograph, post and discuss the artistic process.  I am going to look at their blogs and see if it is working.

I really do get the idea of shared creative process (or better put, I feel your pain.)
 
The goal of the process pledge is to create a new sensibility in quilting blogs where we don’t just show finishes or occasionally confess about our moments of indecision, but chat openly and often about our works in progress, our inspirations, and our moments of decision. 

Rossie says:
"I know that many of us are already posting about our thinking on quilts and the processes involved from start to finish, let's do more!  And let's post about quilts as we work on them.  I want to see more half-done quilts, not just the finished thing with a journal entry about the process."

Then she goes on to list some prompts to help us with the 'process'......
  • Do you have any new sketches to show?
  • Is this design inspired by a past quilt or someone else's quilt you saw (link, please)?
  • Does the color palette come from somewhere specific?
  • Are you trying to evoke a specific feeling?
  • Is this quilt intended for a specific person?  How did that inform your choices?
  • Are you following a pattern, emulating a block you saw somewhere, using a liberated process, or totally winging it?
  • What are you hating about this quilt at this stage?  What do you love?
  • Did you push yourself to try something new?
  • In working on the quilt, are you getting ideas about what you might want to try next?  What?  Did you sketch it?
I will keep this on hand so that I can talk about what I am doing.  Take the pledge and then see how it affects your approach to your craft.  I have a feeling we might start considering ourselves artists.  (smiles condescendingly).  You think?

Sunday, October 24, 2010

Fried egg, avocado, hash browns & hot sauce

My flickr friend Shutterbean posted this recipe and well, I had to make it myself!  You should too! She has given step by step instructions.  Here is the link to her blog 


Saturday, October 23, 2010

Pickled Apple Sauce Base for Scallops: 10.22.2010

 Perhaps you are the pickled one.

Pickled Apples
2 cups cider vinegar
1 cups water
1 cup sugar
1 cinnamon stick
6 cardamom pods
1/2 tsp coriander seed
1/2 tsp mixed peppercorns
10 honeycrisp apples, cut into brunoise

- bring all ingredients but apples to a simmer, remove from heat and cool slightly
- add apples and set aside 1 hour
- remove apples from liquid and vacuum seal at 75 psi for at least 1 hour

Sauce
6 cups fresh apple juice
1 cup heavy cream
3/4 cup pickled apples (recipe above)
1/4 cup minced candied ginger

- reduce a la minute and mount with butter

Saffron Stewed Tomato Sauce for Halibut: 10.22.2010

Some of you may notice that this bears an uncanny resemblance to the Spanishy something or other from the past - that is if you existed outside the confines of my mind, but really I'm just talking to myself.

1 cup olive oil
2 qts sliced onions
4 links chorizo, peeled and chopped
4 qts peeled, seeded and diced tomatoes, juices reserved
4 Tbsp salt
2 Tbsp pimenton
1 tsp pepper
1/2 cup sherry warmed with 1 Tbsp saffron
3 cups strained tomato juices
1/4 cup cabernet vinegar

- sweat the onions and chorizo in the olive oil over medium heat until the onions soften
- add tomatoes, salt, sherry w/ saffron, pepper and pimenton
- cook over high heat, stirring often, for 5 minutes
- add remaining ingredients and simmer 45 minutes to and hour; adjust seasoning if necessary
- puree in blender until smooth

Quote Unquote Brandade

This really isn't brandade per se, but that's what I'm calling it 
and there's nothing any of y'all can do about that.

5 oz olive oil
2 bulbs garlic (about 20 cloves), cloves peeled and smashed lightly
2 lbs halibut and/or swordfish, diced
2 qts tater tots, fried
2 tsp pimenton dulce
4 oz chardonnay
1 oz sherry
4 Tbsp gremolata
salt and pepper to taste

*** season as you go***

- warm the garlic in the olive oil over low heat until light golden
- add fish and saute 5 minutes, stirring often
- add fried tater tots and saute 5 minutes, stirring often
- add wines and stir until evaporated
- remove from heat and stir in gremolata; season to taste
- pulse in food processor until well chopped

Friday, October 22, 2010

New Vinaigrette for Green Salad: 10.22.2010

 Looks like somebody's been hitting the vinegar.


30 large shallots, rough chopped
1/2 lb chervil
2 bunches chives, chopped
1/2 cup tarragon leaves
3 cups wildflower honey
2 cups dijon mustard
1 cup coarse sel gris
3/4 cup kosher salt
2 Tbsp black pepper
1 gallon plus 2 cups red wine vinegar
6 liters unfiltered Lebanese olive oil
3 liters kalamata olive oil
3 liters grapeseed oil

- process all ingredients except vinegar and oil in robot coupe until thoroughly combined
- transfer to a 5 liter container and using hand blender, blend in vinegar
- slowly incorporate oils while blending until thoroughly combined

Complimentary Fall Quilting Pattterns

This in  from Jenni over at Quilters village "It's autumn, and cooler temperatures plus the inspiring colors of the season make this a great time for quilting. Our websites are full of wonderful free quilt patterns with fall themes, from Halloween to nature's bounty to Thanksgiving and beyond.  Visit McCallsQuilting.com for a pattern for a pumpkin  quilt perfect for wall or table, designed by
Colleen Reale and Chloe Anderson of Toadusew Creative Concepts


Pennsylvania Scrapple
QuiltersNewsletter.com has a bonus pattern for a super new Halloween quilt by Jason Yenter. Dig deep into your stash and make your own version of Pennsylvania Scrapple, an exciting scrap quilt by Irene Berry, patterned by Quiltmaker.  Click here to down the pdf pattern.  And McCall's Quick Quilts has a pattern for a super quilt for football fans. No matter which aspects of fall are your favorites, we've got you cozily covered with patterns for quilts to celebrate!"

Thursday, October 21, 2010

Stacked Coins Baby Quilt Tutorial


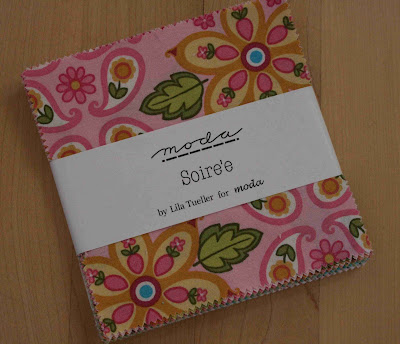
2 charm packs-Soiree by Lila Tueller
1 1/2 yards white fabric for sashing/borders
1/2 yard fabric for binding
1 1/2 yards of fabric for backing
batting that measures 44" x 55"
quilting thread


please note: 1/4" seams are used throughout this project.

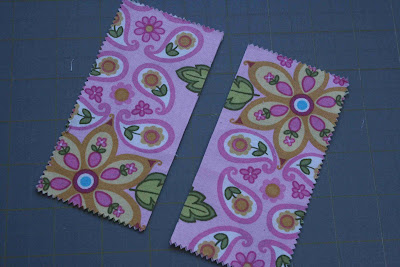
Cut each charm in half. This will yield 144 "coins". Each will measure 2.5" x 5". (You will use all but 12 coins for this quilt.)
Sew coins together. I found it very helpful to match the pinked edges with pinked edges and straight edges with straight edges when piecing.


Make 5 strips of coins. Each strip is made with 22 rectangles.

Cut 6 pieces of white fabric 3.5" wide x 44 1/2" long for the sashing.

If your seam allowances aren't completely accurate, you may want to measure the length of your patchwork strips and cut the sashing to match.

Sew sashing to the coin strips. Press all seams toward the white.Cut 2 pieces 3.5" x 41" for the top and bottom of the quilt. Sew together and press well.
Your quilt top is done!

For the back...
I love adding a patchwork detail to the back of my quilts. It takes a bit more time, but it's a nice way to tie in the design from the front to the back.
Join 22 coins together and press.
From the backing fabric, cut one piece 36" x width of fabric. And one piece 15" x width of fabric.Layout as shown and sew together. Press.And the back is done, too.

To finish your quilt, baste, quilt and bind as desired.

On this quilt, I did an all over stipple in white thread.
I just love the one strip of patchwork on the backing. Wash and dry your quilt for that soft crinkly goodness.


The finished quilt measures approximately 41" x 50".

Sunday, October 17, 2010

Malaysian Red Curry of Beef


 Red Curry of Beef (or Daging masak merah)

 Very delicious.  Read the directions carefully.  you may wish to have everything measured/chopped and skinned before starting as the recipe is quite involved for newbies.


 Ingredients:
2 tsp. chopped fresh ginger
2 tsp. ground tumeric
1/2 tsp. course sea salt
1 1/2 lb sirloin steak cut into pieces (2 pieces per person)
3 Tbsp peanut oil
3 Tbsp thick tamarind water (1 oz tamarind paste placed in hot water and strained)
6 ripe tomatoes, peeled and chopped (blanch them to peel)
1 1/4 cups coconut cream (the thick creamy stuff in the tops of the cans)
handful of mint leaves and cilantro leaves, roughly chopped

Red Paste Ingredients:
3 shallots, chopped
6-8 garlic cloves, chopped
4 large red chilies, seeded and chopped
1 red pepper, seeded and chopped
1/4 cup tomato paste
2 Tbsp peanut oil

Garnish Ingredients:
4 Tbsp deep fried shallots (slice very thin and fry quickly until brown in peanut oil) (drain on paper towel)
2 oz unsalted cashews, fried in a some peanut oil until brown (drain on paper towel)
2 oz raisins, fried very briefly in oil until plump (drain on paper towel)

Directions:

1. Grind the ginger, tumeric and sea salt in a mortar to make a paste. Rub the pieces of beef all over with this paste and set aside for at least 30 minutes.

2. Make the Red Paste- blend all of the red paste ingredients together with 3 Tbsp water until smooth.  Transfer the paste to a large saucepan and simmer over med. heat for 6 minutes, stirring often. Remove from heat and set aside.

3.  Heat the oil in a fry pan and fry the pieces of beef, a few at a time for 2 minutes per side. Set aside.

4. Reheat the paste in the saucepan, stirring well for a couple of minutes, then add 1/2 cup HOT water and the tamarind water.  Bring to a boil.  Add the beef, stir and cover.  Continue cooking over medium heat for 6-8 minutes.

5. Add the tomatoes and stir to mix with beef.  Cook for a few more minutes, now add the coconut cream and continue cooking, turning meat several times, until the sauce has reduced.  Just a few minutes.  In the final minute add the cilantro and mint leaves. 

6. Serve hot with garnish of fried shallots, cashews, and plump raisins.

serve with coconut rice

Friday, October 15, 2010

Salsa Atole for Salmon: 10.15.2010


 (above paragraph has no relevance, but it's a true story)

1 lg spanish onion, minced
8 cloves garlic, minced
4 Tbsp butter
2 Tbsp smoked Maldon sea salt
1 Tbsp turbinado sugar
3 qts chicken stock
1 qt half & half
2 cups maseca

- sweat onions and garlic in butter until soft
- add salt, sugar and chicken stock and bring to boil
- add half & half and return to boil; reduce heat to low simmer
- whisk in maseca bit by bit until incorporated
- transfer to a double boiler and cook 20 minutes; keep warm

Pepita-Chard Mole for Salmon: 10.15.2010

 As a child in rural Mexico, I lived with my dearest Abuelita on a chard and pumpkin farm, and I'll never forget this recipe, passed down through generations. Usually we'd reserve this sauce for braised chicken thighs and a nice cool glass of Coca Cola made with real sugar.

4 qts packed chard leaves and stems
1/4 lb cilantro
6 cups pumpkin seeds
8 cloves garlic
1 large onion, chopped
4 Tbsp salt
1 1/2 tsp black cumin
1 gallon chicken stock
2 cups seasoned beef tallow from confit

- working in batches, thoroughly puree together all ingredients except beef tallow; set aside
- heat beef tallow over high heat; add puree and reduce heat to low
- cook slowly for 20 minutes, whisking often; adjust seasoning if necessary

Wednesday, October 13, 2010

Some more about fabrics...

Modal

My quest continues to learn more about fiber and what it means to all of us....from an environmental and economic view.  I deal with fabric every day..... I make quilts and bags, I shop for it,  I read about it and I have blogged about it. Back in June, I came across information that led to a fiber epiphany ..... I was aghast at what I found and so I blogged about the what I found.  


Recently a friend asked me about modal...if I knew what it was.  Had no clue....so I googled around a bit and found some information - not only on modal but some other fabrics as well.  Thought y'all might  be interested in this site www.envirofabrics.net ...here is a little of what I found there.


Silk.....an easily dyed fiber that retains its shape; cool to wear in the Summer and warm in the Winter.....

Wool......a hearty fiber that’s light weight; naturally wrinkle and dirt resistant as well as absorbs moisture

Linen/Flax.......70% cellulosic, it absorbs as much as 20 times its weight in humidity before feeling damp. Linen fibers are naturally non-allergenic, antistatic and antibacterial

Cashmere.....a luxurious goat wool imported from Central Asia

Viscose....called an artificial silk, it has a silk-like aesthetic with superb drape and feel. Viscose is moisture absorbent, abrasion resistant and low in pilling.

ProModal
® ....a blend of TENCEL® and Modal® fibers combining Modals soft hand with Tencels moisture absorption's skin sensitive properties and strength. With ProModal® you can feel nature. The fiber blend is extracted from wood. Timber from sustainable grown forest plantations have a much lower impact on the environment than cotton, consuming 10 to 20 times less water than cotton.

Modal LP
®......a 100% Modal for garment dyers that will greatly diminish the pilling and hairiness effect associated with regular Modal in garment dyeing.

Supima Cotton/MicroModal
®......if hand and softness is needed for drapability, then the intimate blending of two yarns creates an unbeatable product. Buttery soft knit fabrics in a variety of stitches and colors.

Triblend......using a combination of polyester/cotton and Rayon intimate blended to form textural yarns. Used in a variety of coarse gauge sweater knits for contemporary fashion.

Sunday, October 10, 2010

čudan datum-10.10.10-strange date

..i zadnje kupanje..kažu-kiša će!
.. .. and the last swiming...


uvijek se pitam:Gdje  li će ovaj?Šta sad rade gore, jedu li nešto fino?
.. always ask myself: Where do they travel?

Saturday, October 9, 2010

Baby Quilt Tutorial

Tutorial: The 3-2-1 Throw, A Quick, Easy Little Quilt

3-2-1 Quilted Throw My Happy Garden Organic Fabric
Melanie over at Modern Organic Fabrics has put together a tutorial for a fast and fun quilt.  To the gals in my Project Linus Group, I am thinking this would a great pattern for baby size.

According to Melanie this is "Perfect for beginners who feel a bit intimidated about quilting, or for the more experienced who want to put something together super-quick! This quilt utilizes the "pillow-case" method of binding, so there are no bias strips to make. Please note, however, this method of binding quilts is best only for small quilts like throws and baby blankets."

The 3-2-1 Quilted Throw is made with organic fabrics and organic batting. Fabric shown is from Melanie's  "My Happy Garden" collection by Cloud9 Organics. (Found at Modern Organic Fabrics Shop)

Supplies:
~My Happy Garden organic cotton fabric as follows:
  • Speckle Grass - 12 1/2" x 48"
  • Meadow - 12 1/2" x 24 1/4"
  • Speckle Sun - 12 1/2" x 24 1/4"
  • Speckle Sky - 12 1/2" x 16 1/4"
  • Toadstools - 12 1/2" x 16 1/2"
  • Flock - 12 1/2" x 16 1/4" 
  • Lines -  approximately 37" x 49" (this is the backing fabric, it is cut a little large at first and will be cut to size after the front is finished)
~Organic cotton batting:
  Approximately 40" x 50" (cut a little large, will be cut to size when the front is finished)
~Thread

Tools:
~Rotary cutter & cutting mat (or scissors)
~masking or painter's tape
~pins
~sewing machine (or needle & thread)
 ***1/4 inch seam allowances are used, unless stated otherwise***
Courtesy of Modern Organic Fabrics
Diagram is not to scale

~Step One~
Cut pieces for quilt front. Do not cut back to exact size yet.

~Step Two~
With right sides together, pin Speckle Sky and Toadstools together on one short side and stitch. Place Flock on Toadstools, right sides together, pin and stitch on short side.
~Step Three~
With right sides together, pin Meadow and Speckle Sun together and stitch on one short side.
Photo:  Courtesy of Modern Organic Fabrics

~Step Four~
 Place each column on the batting in it's approximate finished spot. Remove the 3-piece column and the 1-piece column. Pin the 2-piece (middle) column to batting.
Photo:  Courtesy of Modern Organic Fabrics

~Step Five~
 Stitch the middle row to the batting by stitching around the edge.
Photo:  Courtesy of Modern Organic Fabrics

~Step Six~
 Place the 1-piece column right side down on the 2-piece column. Pin and stitch long sides together (you are also stitching it to the batting).
~Step Seven~
 Flip the 1-piece column back, pin wrong side to batting. Stitch around edge.
Photo:  Courtesy of Modern Organic Fabrics


~Step Eight~
 Place the 3-piece column face down on the 2-piece column. Pin and stitch long sides together (you are also stitching it to the batting).
~Step Nine~
 Flip the 3-piece column back, pin wrong side to batting. Stitch around edge.
Photo:  Courtesy of Modern Organic Fabrics


~Step Ten~
 Trim the batting to the quilt top. Make sure the quilt edges are straight and corners are squared up, trim if necessary.
Photo:  Courtesy of Modern Organic Fabrics


~Step Eleven~
 Tape the backing fabric to a table or the floor right side up. Place the quilt top right side down on the backing and pin. Trim the backing to same size as top, keep quilt pinned together.
~Step Twelve~
Stitch front and back together, leaving a 4-inch opening on one short side.
Photo:  Courtesy of Modern Organic Fabrics


~Step Thirteen~
Trim the corners. Turn quilt inside-out and use a dull, pointed instrument (such as a chopstick) to turn out corners.
~Step Fourteen~
Press edges. Sew opening closed (the best way is to hand sew it closed).
Photo:  Courtesy of Modern Organic Fabrics

~Step Fifteen~
Sew around edge of quilt using a 1/2-inch seam allowance.

Photo:  Courtesy of Modern Organic Fabrics

~Step Sixteen~
You can be finished, if you'd like. This quilt is small enough that you don't have to quilt the back. However, this is a great little quilt to practice some machine quilting. I used a walking foot on my machine and stitched random diagonal lines.